
Create your departments
The stations work flows through, in the order it flows.
What this is for
Departments are the stations a job moves through — design, print, cutting, fabrication, paint, assembly, dispatch, install. Every production step, job sheet section, floor board and capacity figure hangs off them, so they are the first thing to set up after your shop details.
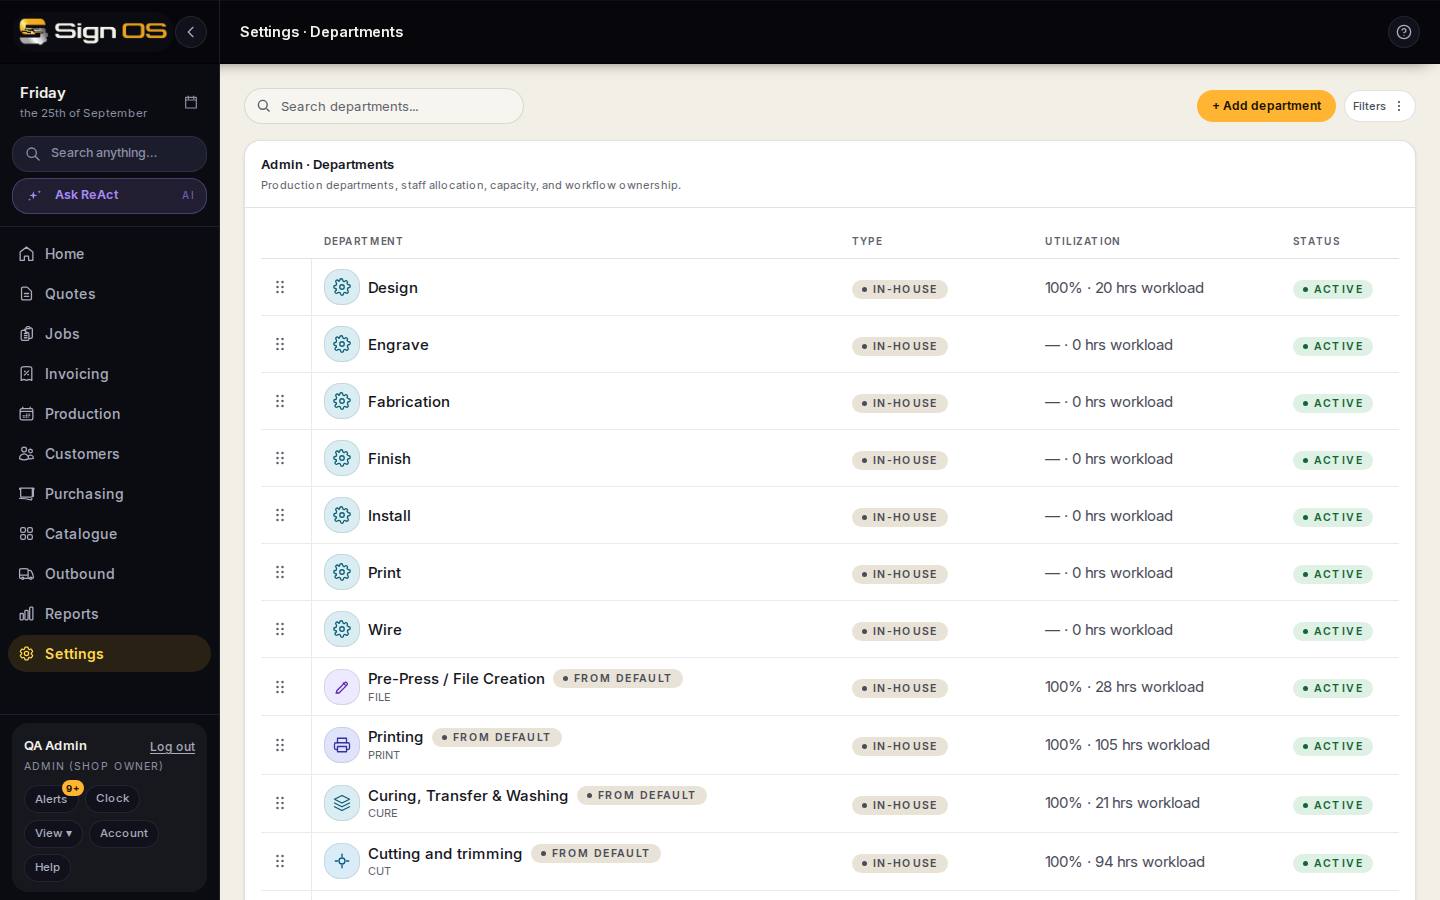
What is on this screen
Each part of the screen above, top to bottom, and what changing it affects.
The list
- + Add department
- Name and type. The type (Print, CNC / Router, Paint / Finish, Install…) is what starter recipes and the wizard look for.
- Reorder handle
- Drag rows into production order — jobs and job sheets follow this sequence.
- Department · Type · Utilization · Status
- Name with its code, In-house or Outsourced, this week's workload against capacity, and Active or off. FROM DEFAULT marks one that came with the starter set.
Inside a department
- Overview
- Name, type, colour and weekly capacity, with workload at a glance. An in-house department also has its At-risk buffer %: how much slack it needs before a job shows as at risk. Blank uses the shop default from Shop hours & calendar. Only people who can change shop hours can edit it.
- Staff
- Who is rostered to it and their hours a week — used when capacity comes from people.
- Capacity
- Where capacity comes from: a weekly minutes figure you set, or the sum of the people in it. Sets the utilisation and at-risk maths.
- Labour rates
- What its time costs — see Set labour rates per department.
- Schedule
- Its own working hours and closures, if they differ from the shop's.
- Workflow
- The statuses a job passes through in this department, shown on the floor board and job sheet.
- Outsource (outsourced departments only)
- The suppliers work in this department is sent out to.
- Duplicate · Archive · Delete
- Archive hides a department nothing uses any more without breaking recipes that named it.
Before you start
- Decide the real order work moves through your shop; the list is dragged into that order.
Step by step
- 1
Open Settings → Production → Departments and press + Add department. Give it a name and a type (Print, CNC / Router, Paint / Finish, Install and so on) — the type is what the starter recipes look for.
- 2
Open the department. Overview (including its own at-risk buffer, if it needs more or less slack than the shop default), Staff (who is rostered to it and their hours a week), Capacity (weekly minutes, either a figure you set or added up from the people in it), Labour rates, Schedule, and Workflow (the statuses a job passes through in this department). An outsourced department gains an Outsource tab with its suppliers.
- 3
Set the type to Outsourced for work that leaves the building — a powdercoater, a printer you subcontract to. Its capacity is only a forecast. What you charge on top of outsourced work comes from your markups on Pricing & margin.
- 4
Drag the rows into production order. Jobs and job sheets follow this sequence.
Tips & gotchas
- Departments marked FROM DEFAULT came with the starter set. Rename or switch them off rather than deleting, so recipes that name them keep working.
- Utilisation on the list is the coming week's workload against capacity. A department living at 100% is your bottleneck.